Learn to make, move, and modify
Manipulating the Filesystem
Captured History
One way to help cement learning is to take notes
You've already spent quite some time learning today, but have yet to take any notes
Or have you?
As it turns out, your shell keeps track of what you do as you do it
You can look over this record using the history command
Try it out:
$ history
Reading History
You should see something like this:
...
432  ls
433  ls -l
434  cd projects/
435  ls
436  ls -l
437  cd training/
438  ls
439  ls -l
440  cd /
441  cd
442  cdcd
443  cdcd
444  cd /
445  cd
446  cd
447  ls
COMMAND: history
The history command allows you to review and revise the history of actions you've taken in a shell
Providing a numeric argument will list the last n actions:
$ history 5
443  cdcd
444  cd /
445  cd
446  cd
447  ls
Paging Through History
There's probably a lot more output from that command than fits in one screen of your terminal
Most of it scrolled by too fast to read
You could read the last n actions
Or you can review it all at your leisure by combining the history command with another command less:
$ history | less
The pipe character (|) takes the output from the first command and uses it as input to the second
Chain of Commands
Remember the Unix Philosophy:
Do one thing and do it well
Every output can become the input of another program
Here, the text output by history is taken as input to the command less
That command allows you to control the rate of scrolling for longer files
You can press enter to move one line forward at a time
Or press space to move a full screen forward at once
You can also move forward arbitrary numbers of lines, or backward!
Try man less to learn more about this useful comand
COMMAND: less
The less command allows the user to control movement through the reading of a file
It provides controls for moving forward or backward through files at increments of an arbitrary number of lines or screens
It does not read entire files before starting, and so is very fast
It is particularly well suited to input piped from other commands that produce large amounts of text
CONCEPT: Piping
The pipe (|) can be used to use the output of one command as the input to another
This chaining of commands allows the savvy user to combine simple unix commands into complex processes with little effort and powerful results
Saving History
But there's more you can do with this history
Begin by making sure that you are in your home directory using pwd, ls and cd
Next, you'll use the redirection operator (>) to take the output from history and write it to a file:
$ history > moving_around.txt
You can use ls to verify that the new file "moving_around.txt" exists
You can use the t flag to verify that it's the newest file in your home directory
You can even use the less command to read it and verify that it contains your history.
CONCEPT: Redirection
The redirection operator (>) sends the output of a command on the left side to a file named on the right
If the named file does not exist, it is created
If it does exist, it is overwritten
If the operator is doubled (>>) then output is added to an existing file instead of replacing it
You can do a lot more with redirection (try googling for bash redirection) but thats enough for today
Take Notes
Now that you have this file with your command history, open it in your editor:
$ subl moving_around.txt
Take the next 10 minutes or so to edit that history
Add notes to lines after the commands you found particularly interesting or surprising
Add information explaining the purpose of a command, and the result
You can delete boring lines or even your embarassing mistakes
Take this opportunity to ask your instructors questions, if you haven't already
Make sure you understand everything you've done so far today
Keep It Safe
Come to think of it, it might be nice to keep these notes (and more you'll make today) safe
Let's begin by making a place to keep them
Use the mkdir command to create a new directory here in your home directory to hold these notes:
$ mkdir uge_workshop
Use ls to confirm that the new directory exists
Use the l flag with ls to confirm that the new directory is a directory
Put Things in Their Place
Now that you have a directory to hold your notes, move them on in
You can use the mv command to move a file from one place to another
This command is a bit different from others we've seen in that it requires two paths
The first is the address of the thing you want to move
The second is the address of where you want to put it
$ mv moving_around.txt ./uge_workshop/
Better Names
Actually, the filename "moving_around.txt" is not all that great
We should rename it to something better, like "unix_notes.txt"
You can use the mv command to do this, too:
$ mv ./uge_workshop/moving_around.txt ./uge_workshop/unix_notes.txt
That's better
Don't forget to add any notes you might want about mv to your newly renamed file
COMMAND: mv
The mv command allows moving files from place to place in a filesystem
The command expects two paths: a thing to be moved and a place to move it
The command can be used to move files and also to rename them
Flags allow you to handle conditions like there being a file of the same name already in the destination in various ways
Try man mv to learn more about this command
Saving Your Work
You've got all these great notes
It'd be terrible if something were to happen to them
This is where having something like version control can come in handy
It can allow you to keep a history of your work on a project like this safe
And can also allow you to collaborate with others over time
We'll start by creating a repository for our work from today
We'll be using the git Distributed Version Control System
Install Git
If you haven't already done so, please download and install git now
http://git-scm.com/downloads
Windows users, please install git from here instead:
http://msysgit.github.io/
Basic Configuration
You should also be sure to set up the basic configuration git requires
In order to make commits, git wants to know your name and email address
We use the config git command to set these up:
$ git config --global user.name "Cris Ewing"
$ git config --global user.email "cris@crisewing.com"
Using this information, each time you make a commit git will record that you made the changes, and will provide contact information for any who wish to consult with you.
GIT COMMAND: config
The config command sets configuration values either globally or for a single repository.
You can use it to let git know who you are and control the way git works for you.
You can read more about this powerful command in the Git Configuration chapter of the Pro Git book.
Your First Repository
Once git is installed and configured, creating your first repository is a snap
Begin by changing directories into the one that holds the files you want to save
In your case, that's the new uge_workshop directory you just created a moment ago
Once there, use the init git command to create a new repository
$ git init
Initialized empty Git repository in /home/cewing/uge_workshop/.git
GIT COMMAND: init
The init command creates a brand new repository in your current working directory. (remember pwd?)
You only need to run this command once for any project you start.
You do not run this command for projects you clone from other sources like GitHub.
Read more about how to start a repository in the chapter Getting a Git Repository in the Pro Git book.
What's Up, Git?
You can now check the status of your repository using status:
$ git status
On branch master

Initial commit

Untracked files:
  (use "git add <file>..." to include in what will be committed)

    unix_notes.txt

nothing added to commit but untracked files present (use "git add" to track)
Notice that git is quite verbose in telling you what's going on
You can see that you have one untracked file
Git even tells you what to do next
GIT COMMAND: status
The status command will provide information about the current state of your repository.
You use it to see which files need to be added and which have been changed and are awaiting commits.
You should make a habit of frequently checking the status of your repository to develop a good awareness of how things are changing.
Read more about this command in Recording Changes to the Repository in the Pro Git book.
Adding your first file
A repository is simply a collection of things you care about
In order for git to save anything, it must first be added to the repository
Use the add command to add your unix_notes.txt file:
$ git add unix_notes.txt
There should be no output here, but your file has now been added
GIT COMMAND: add
The add command places a new file under the control of your repository.
Once a file has been added, git is aware of the file and will track changes to it.
The command also adds files that have been modified from their known state to the stage.
Read more about add in Recording Changes to the Repository in the Pro Git book.
QUESTION
How can you tell that the file has been added to the repository?
Always Check Status
Of course, you use status
It's a good idea to develop the habit of checking the status of your repository regularly
$ git status
On branch master

Initial commit

Changes to be committed:
  (use "git rm --cached <file>..." to unstage)

    new file:   unix_notes.txt
You can now see that the notes file has been added and is ready to be committed
Git is Helpful
Pay attention to one specific part of the output of your status command:
Changes to be committed:
  (use "git rm --cached <file>..." to unstage)
This is one example of how git tries to be helpful to users.
It is telling you that you can undo what you've just done.
Learning to read these helpful messages will help you level up in your git skills.
Commits Save Changes
Until you commit your chages nothing is permanent
As the previous slide showed, we could still unstage these changes, allowing our repository to forget this file exists
But we don't want to do that
So let's go ahead and use commit to save what we've done:
$ git commit -m "adding unix notes, first draft"
[master (root-commit) 0bc447c] adding unix notes, first draft
 1 file changed, 0 insertions(+), 0 deletions(-)
 create mode 100644 unix_notes.txt
And status shows the result:
$ git status
On branch master
nothing to commit, working directory clean
Being Informative
Keeping a history of your work is good.
Providing descriptions of the changes you make is even better.
In your first commit above, you modified the git commit command with a flag: -m
This flag takes a single argument, a message about the commit you are making.
If you don't provide this flag, git will open a text editor so that you can provide this message.
GIT COMMAND: commit
The commit command is used to create a permanent record of changes to your repository.
It saves all the changes that have been staged.
Each commit saves:
- The changes made to each file on the stage
- The identity of the person who made the changes
- The date and time the change was made
- A brief message about the nature of the changes made
- A universally unique identifier for the set of changes
Read more about this command in Recording Changes to the Repository in the Pro Git book.
What Makes a Repository?
You have now created a repository and added a new file to it
You can even look at the history of your repository now (short though it may be)
$ git log
commit 0bc447c0cfd0b7856cd19c705e8eefa0c64283de
Author: cewing <cris@crisewing.com>
Date:   Sat Nov 15 03:33:09 2014 -0800

    adding unix notes, first draft
But how does this all happen?
Where is the stuff that makes this work?
Peek Behind the Curtain
If you use the ls command inside your repository, all you'll see is your notes file
But there's more there than meets the eye
Use the a flag to ls to see all items in the folder:
$ ls -la
total 0
drwxr-xr-x   4 cewing  staff  136 Nov 15 03:15 .
drwxr-xr-x   6 cewing  staff  204 Nov 15 03:15 ..
drwxr-xr-x  13 cewing  staff  442 Nov 15 03:33 .git
-rw-r--r--   1 cewing  staff    0 Nov 15 03:15 unix_notes.txt
That .git directory is the special secret sauce
Everything that git knows about your repository is held in that folder
If you delete it (don't), your repository becomes just another directory
CONCEPT: Hidden Files
This .git directory is an example of a hidden file
In Unix, any file whose name begins with . is, by default, not shown to the user unless specifically asked for
This helps to keep the clutter associated with maintenance and configuration out of sight
The . and .. items in every directory on the filesystem are also examples of this type of file
You know what they do, right?
Add a note to your unix_notes.txt about hidden files
Tracking Changes
Now that your notes file has changed, you'll want to preserve that change
Start by viewing the status of your repository:
$ git status
On branch master
Changes not staged for commit:
  (use "git add <file>..." to update what will be committed)
  (use "git checkout -- <file>..." to discard changes in working directory)

    modified:   unix_notes.txt

no changes added to commit (use "git add" and/or "git commit -a")
Notice that you have two choices, to add the file or to discard the changes
Also notice that git offers you a choice to use git commit -a
Do Not Do That
Stage Your Changes
You have a file that has been changed, you must add the file to the stage so it can be committed
$ git add unix_notes.txt
$ git status
On branch master
Changes to be committed:
  (use "git reset HEAD <file>..." to unstage)

    modified:   unix_notes.txt
Notice that this time, the file is marked as modified instead of new
You can now commit it:
$ git commit -m "added note about hidden files"
[master 4eca5ad] added note about hidden files
 1 file changed, 1 insertion(+)
Simple Workflow
And that's the basics of git workflow
You init a repository once
Then you add a file or files to it and you commit those changes
Then you modify the files, add them to the stage and commit the changes
Lather, rinse and repeat
Building History
Check your log to see the history of your changes unfold:
$ git log
commit 4eca5ad05bb6e3bc92595a9703a3c5c8da410820
Author: cewing <cris@crisewing.com>
Date:   Sat Nov 15 04:11:17 2014 -0800

    added note about hidden files

commit 0bc447c0cfd0b7856cd19c705e8eefa0c64283de
Author: cewing <cris@crisewing.com>
Date:   Sat Nov 15 03:33:09 2014 -0800

    adding unix notes, first draft
GIT COMMAND: log
The log command shows a view of the history of your repository
That history can be displayed in a wide variety of ways
Learning how to use the log command will help to make you a git power user.
You can read more about this command in Viewing the Command History in the Pro Git book.
Stepping Back
In which we learn a bit about what's going on here
What is git?
A "version control system"
A history of everything you do to your files
A graph of "states" in which your files has existed
That last one is a bit tricky, so let's talk it over for a minute
Our History, So Far
We began by creating a brand new, empty repository with git init:

Our History, So Far
We added a new file to the repository and committed that change with git commit:

Our History, So Far
Then, we updated that file, added the modifications to the stage, and committed again:

A Picture of git

A git repository is a set of points in time, with history showing where you've been.
Each point has a name (here A, B, C) that uniquely identifies it, called a hash
The path from one point to the previous is represented by the difference between the two points.
A Picture of git
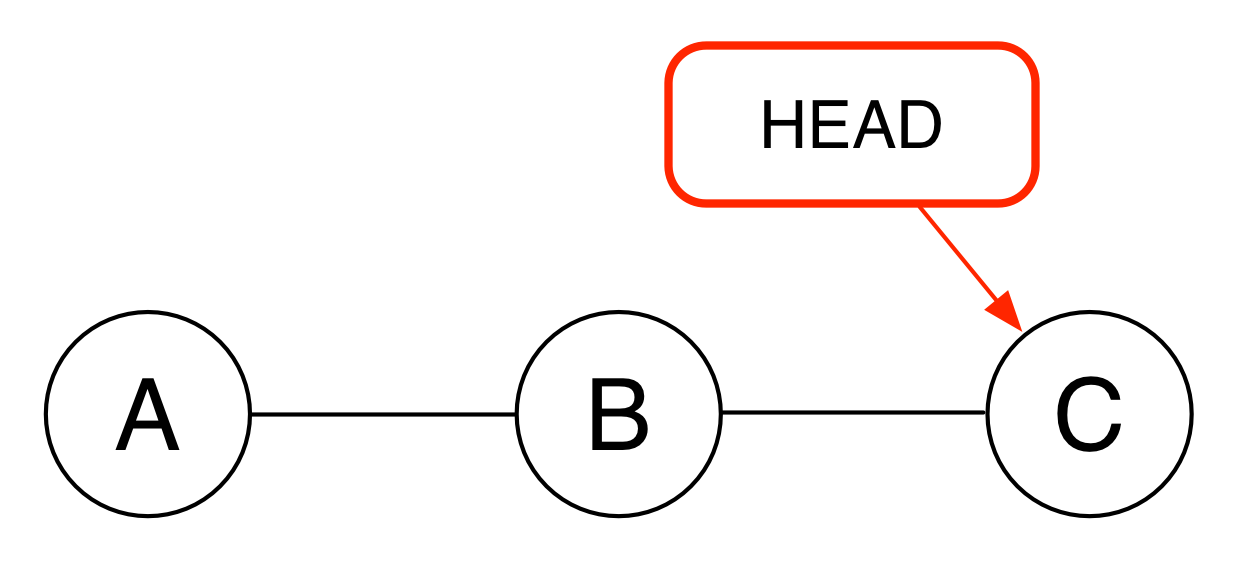
Each point in time can also have a label that points to it.
One of these is HEAD, which always points to the place in the timeline that you are currently looking at.
A Picture of git
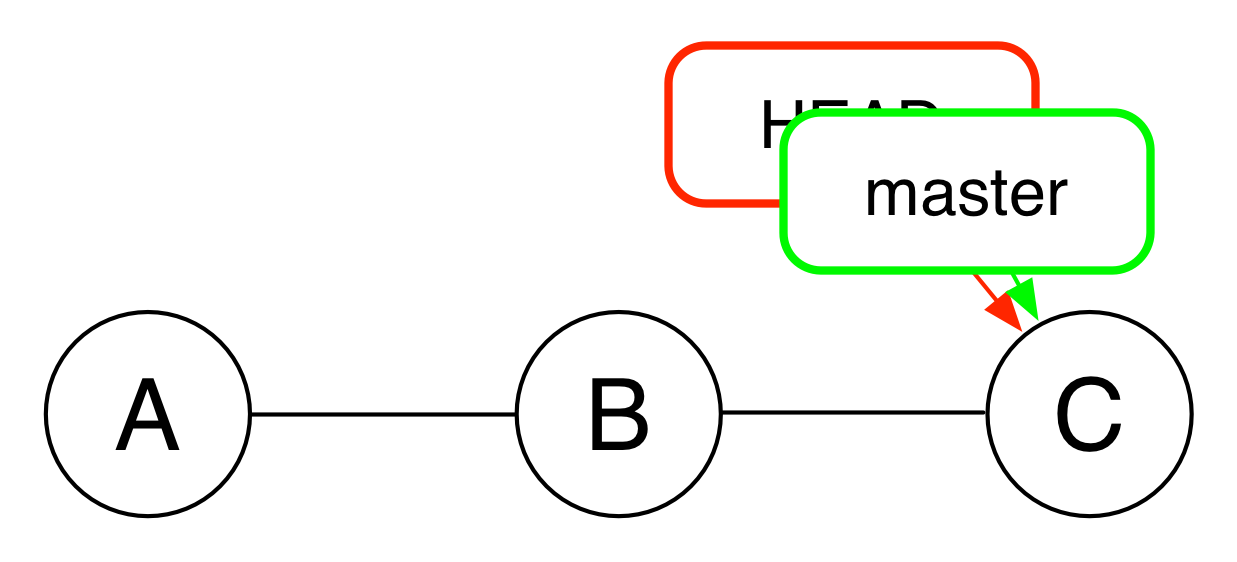
You may also be familiar with the label "master".
This is the name that git automatically gives to the first branch in a repository.
A branch is actually just a label that points to a specific point in time.
A Picture of git
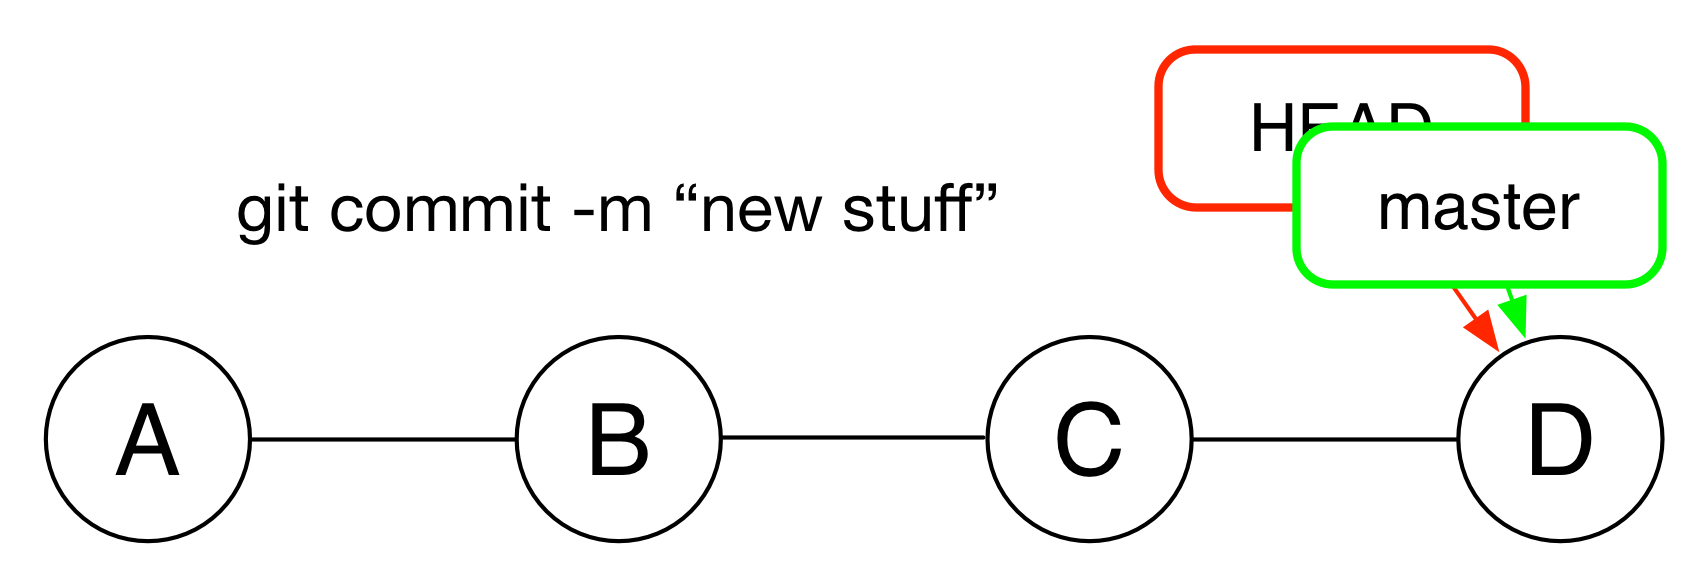
When you make a commit in git, you add a new point to the timeline.
The HEAD label moves to this new point.
So does the label for the branch you are on.
Making a Branch
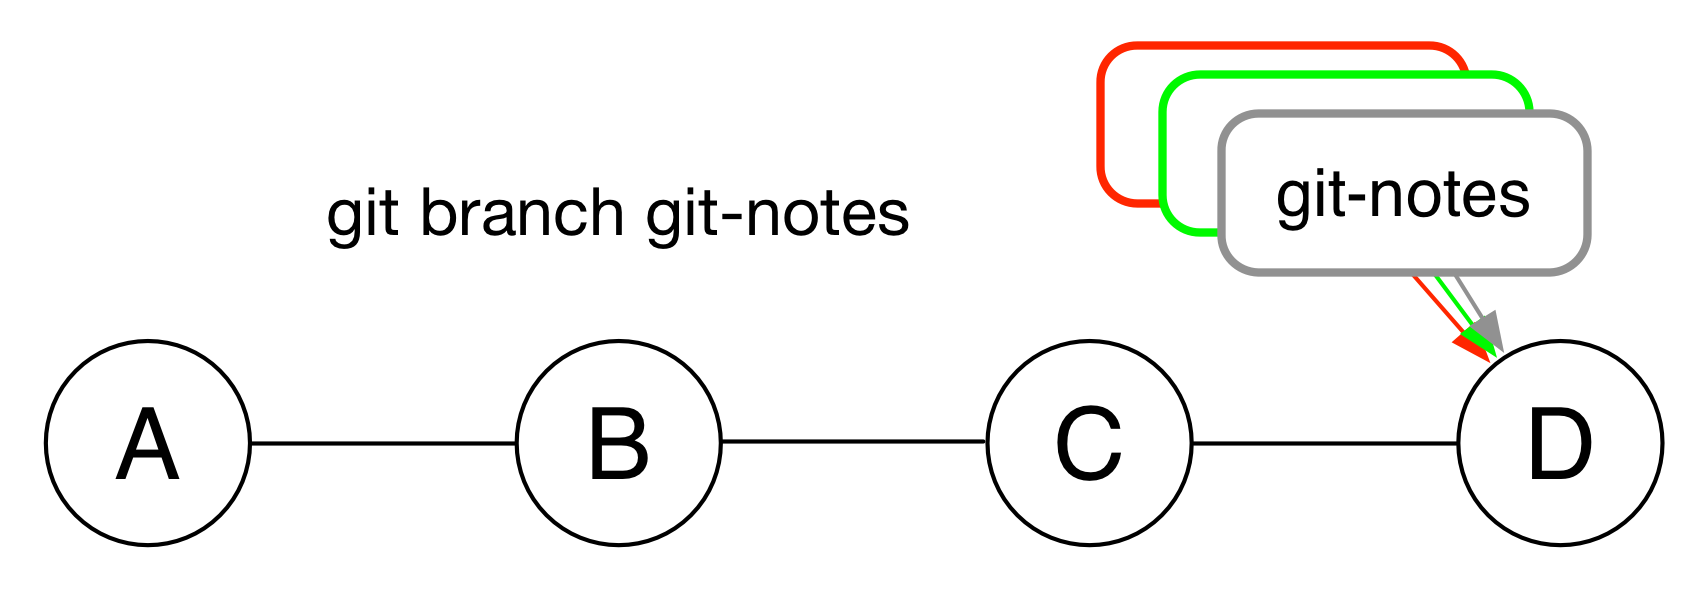
You can make a new branch with the branch command.
This adds a new label to the current commit.
Notice that it does not check out that branch.
Try It Out
Go ahead and try this out yourself
Use the branch command to create a new branch for your repo called git-notes:
$ git branch git-notes
You can see the new branch by using the branch command without a name:
$ git branch
  git-notes
* master
Notice that git tells you which branch you are on with an asterisk (* )
Switching Branches
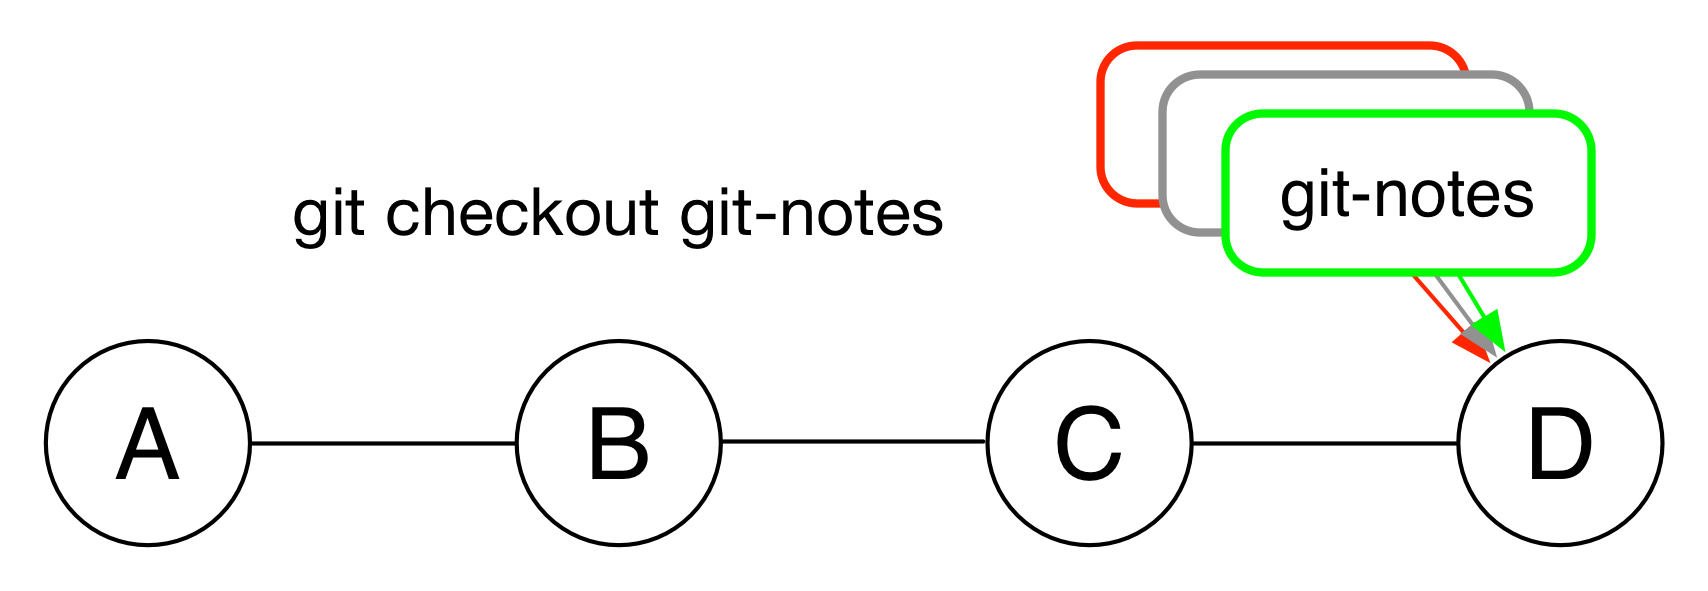
You can use the checkout command to switch to the new branch.
This associates the HEAD label with the session01 label.
Try It Out
Go ahead and try checking out your own new branch with checkout
As you do so, visualize the changes that are happening
$ git checkout git-notes
Use git branch to see which branch is active:
$ git branch
* git-notes
  master
Making a change
Now that you have the git-notes branch checked out, make some changes
First, add a new file to your repository called git_notes.txt
To do so, use the unix touch command:
$ touch git_notes.txt
Then, open the new file in your editor:
$ subl git_notes.txt
Take the next ten minutes to write down your notes on what you've learned about git so far
Saving Your Changes
Once you've finished your notes, don't forget to use your simple git workflow to save them
Do you remember the workflow?
git status
git add git_notes.txt
git commit -m "starting notes on git"
Again, try to visualize what's happening here
Visualizing the Results
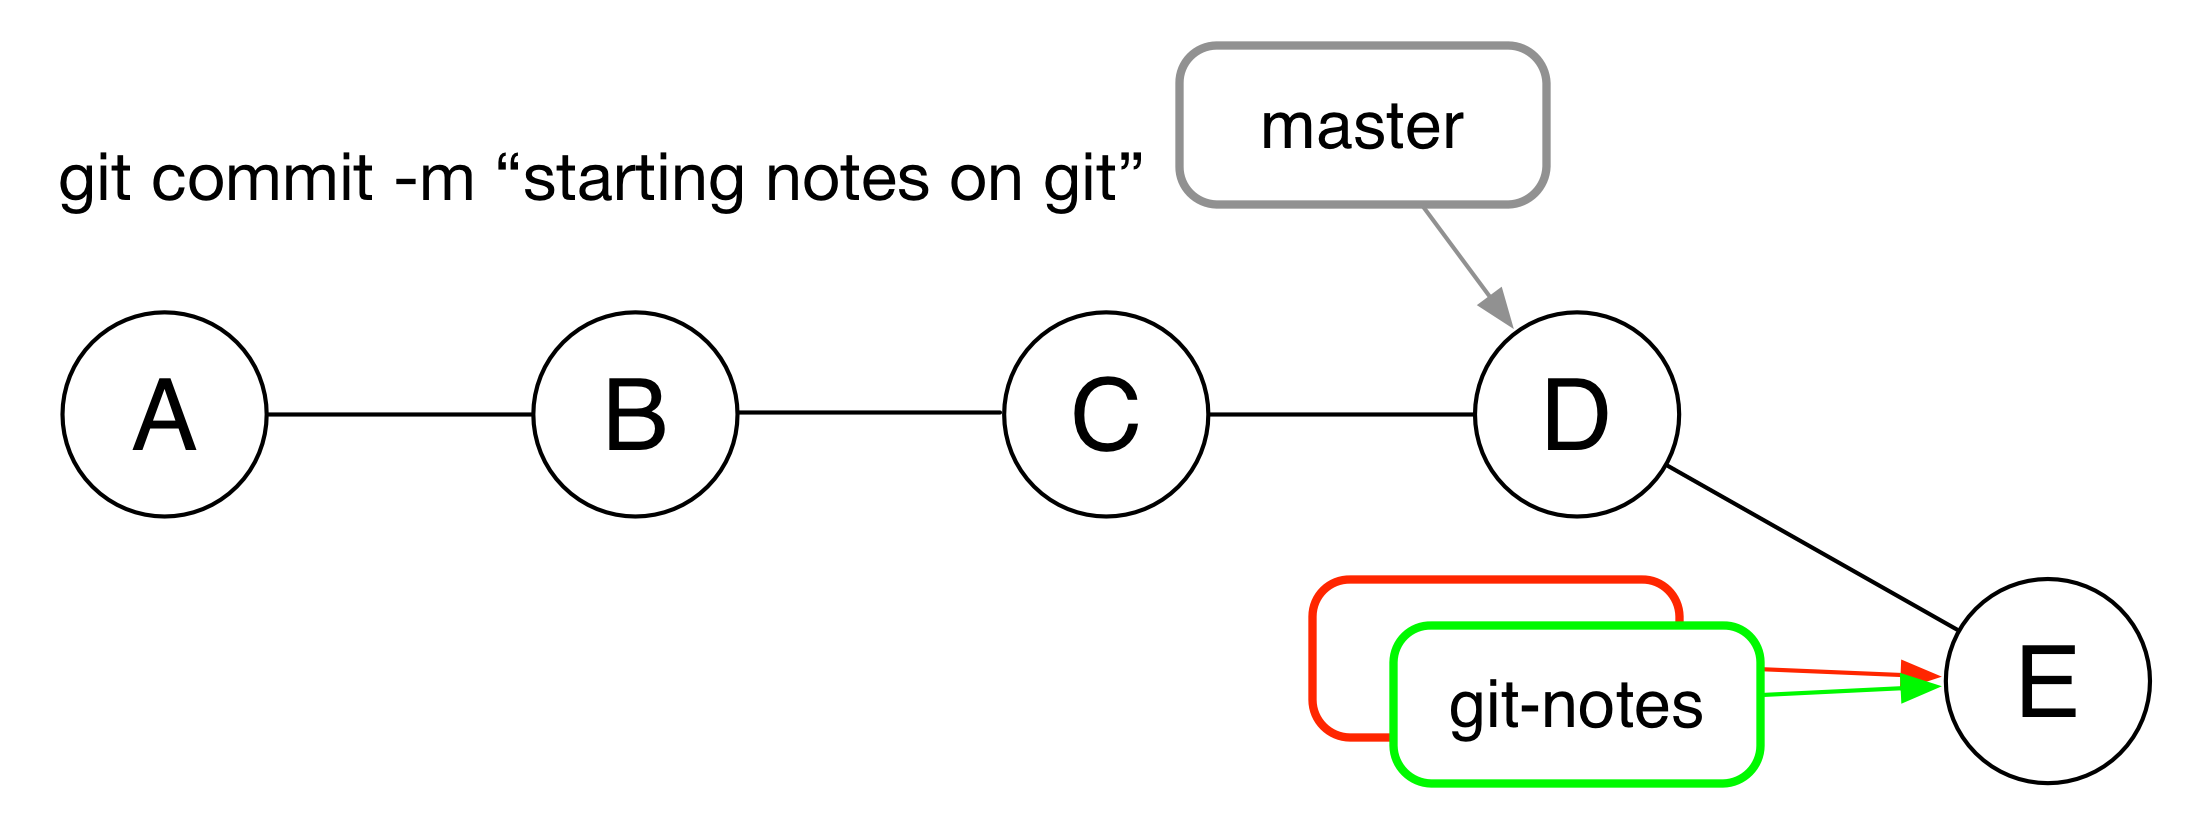
While it is checked out, new commits move the label for the new branch.
Notice that HEAD is always the same as "where you are now"
Isolating Your Changes
You can use this to switch between branches and make changes in isolation.
Working with Remotes
Since git is a distributed versioning system, there is no central repository that serves as the one to rule them all.
Instead, you work with local repositories, and remotes that they are connected to.
In the workshop today, you've created a brand new repository
It is not connected to any remote
You can verify this with the remote git command and the v flag:
$ git remote -v
Enter GitHub
Remotes serve as a way of sharing work with other developers
GitHub has emerged as a premier location for such sharing
It provides you with a common location that anyone can access
In addition, it provides a number of useful tools for managing work that is being shared among a dispersed group of people
But to use it, you must first attach a new, empty repository in GitHub to your local repository as a remote
Begin by opening your browser and going to your personal account on GitHub
Creating a Repository in GitHub
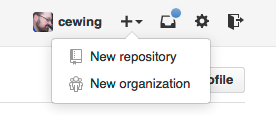
At the top right side of the window, look for your name and avatar
Next to it you'll find a small + sign, click that
From the menu that opens, select New repository
Set Up Your Repository
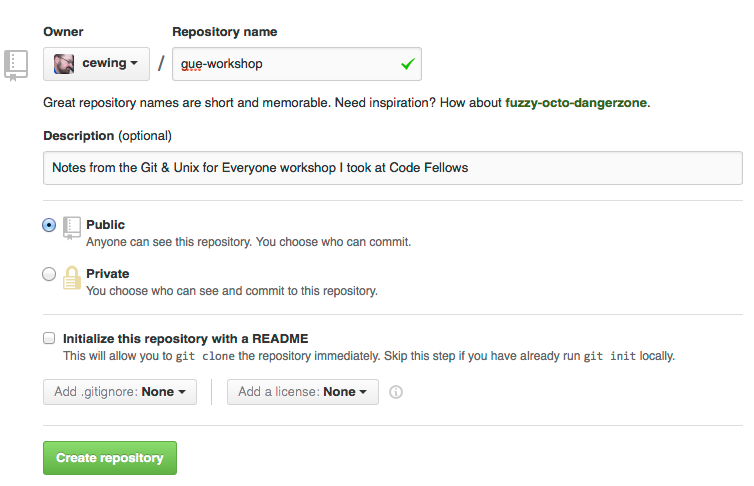
Set up your repository as shown here, then click Create Repository
Add Your Remote
In your browser, you should be viewing your newly created repository
You should see instructions about what to do next.
In your terminal, use your unix knowledge to ensure you are in your local uge_workshop directory
Then, add a remote to your local repository using the remote git command
$ git remote add origin https://github.com/cewing/uge-workshop.git
Verify that this worked using the remote command with the v flag:
$ git remote -v
origin  https://github.com/cewing/uge-workshop.git (fetch)
origin  https://github.com/cewing/uge-workshop.git (push)
GIT COMMAND: remote
The remote command controls interactions with and configuration of remote repositories.
You can use it to connect new remotes, edit the status of existing connections, or remove them entirely.
By allowing connections between local and remote repositories, git facilitates collaboration between developers.
You can read more about remotes in the chapter Working with Remotes in the Pro Git book.
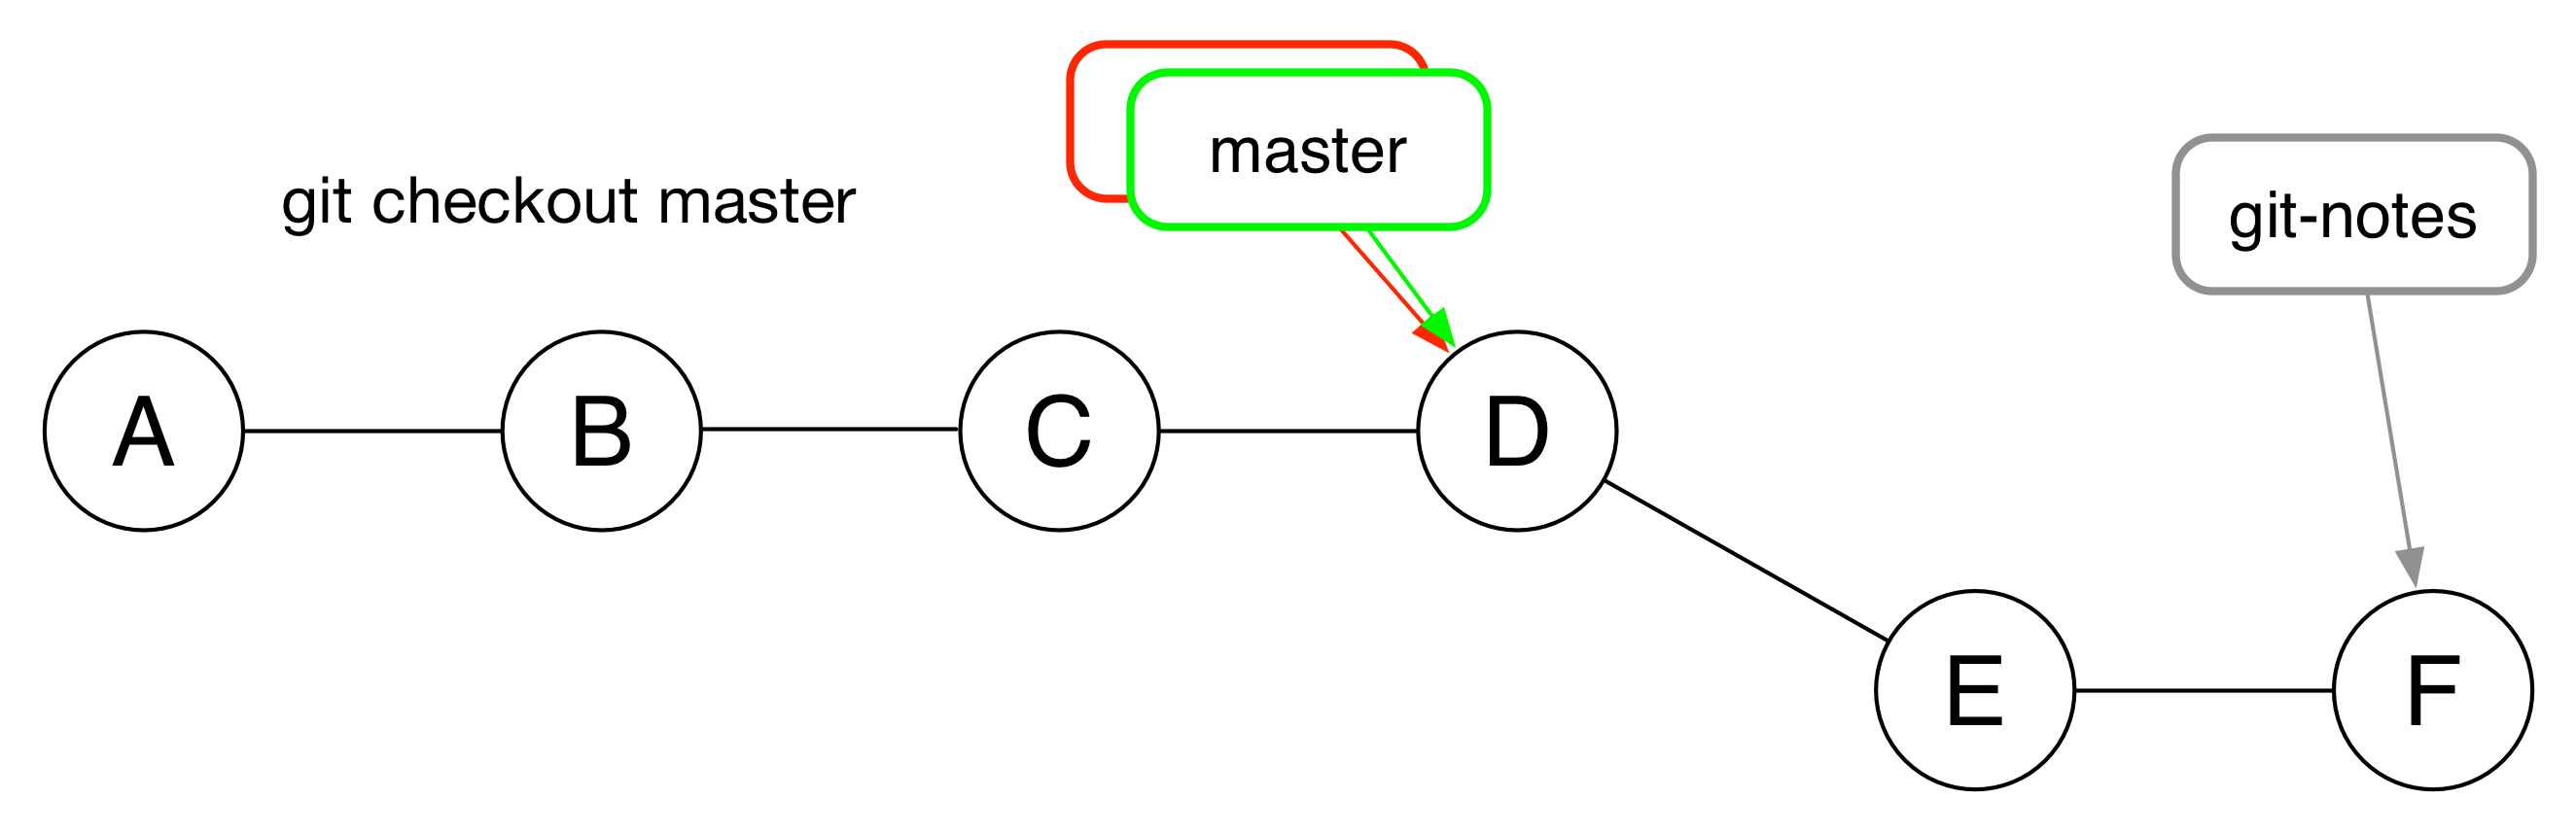
Push to Your Remote
Before pushing, verify that your local repository has the master branch checked out
Remember how to switch branches?
git checkout master
Then, push your master branch to github:
$ git push -u origin master
Counting objects: 6, done.
...
To git@github.com:cewing/uge-workshop.git
 * [new branch]      master -> master
Branch master set up to track remote branch master from origin.
GIT COMMAND: push
The push command sends changes from a local repository to a remote.
You can control which remote to send to, and which branch to send by naming them explicitly on the command line.
You can also use config to set the default so that git behaves as you wish it to.
You can read more about this command starting in the chapter Working with Remotes from the Pro Git book.
Solidify Your Learning
Switch back to your git-notes branch
Once there, spend five to ten minutes jotting down your notes on git remotes
This is an excellent time to ask any questions you might have
After you're done, save your changes in git
Finally, push your git-notes branch up to github too
$ git push -u origin git-notes
...
To git@github.com:cewing/uge-workshop.git
 * [new branch]      git-notes -> git-notes
Branch git-notes set up to track remote branch git-notes from origin.
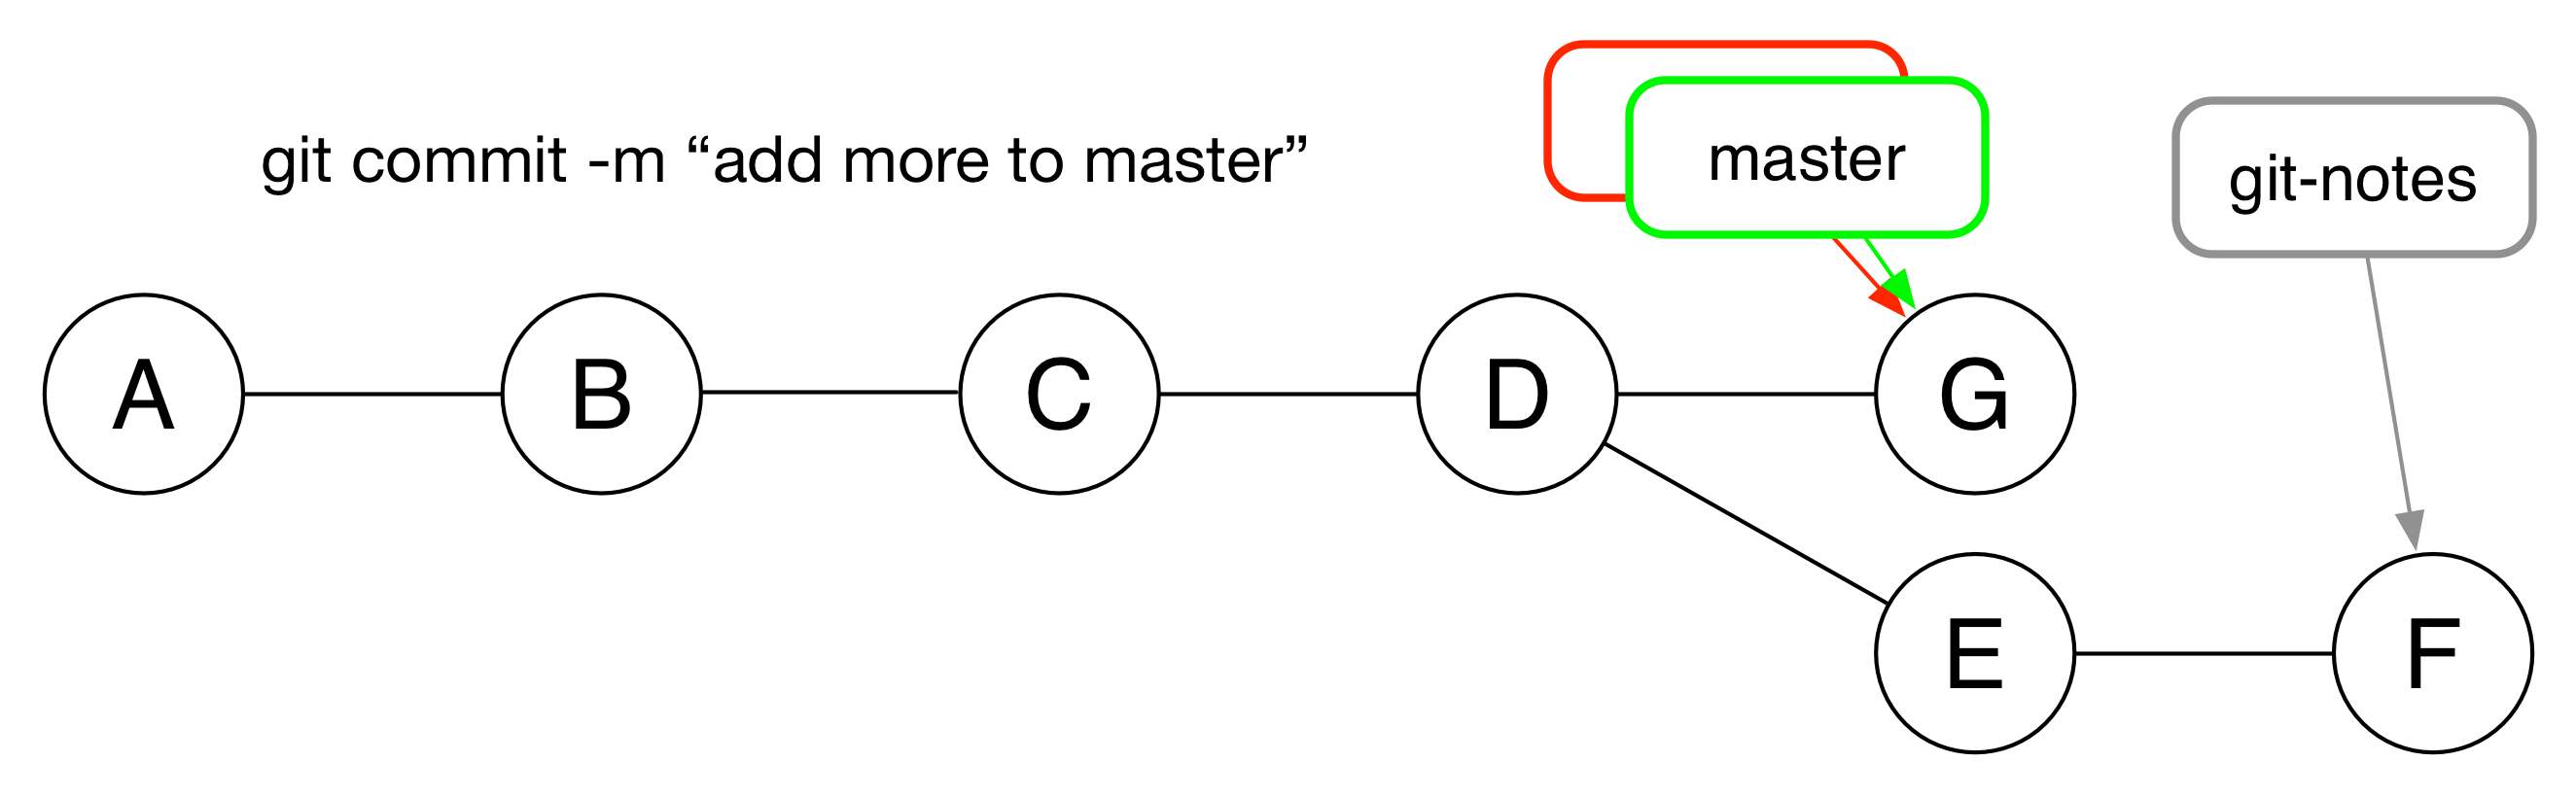
More Git Workflow
What we've just done is very common workflow
Imagine your repository is not notes from a class, but code for a vital website
Further imagine that your production server is running using code on the master branch
You wouldn't want anyone making willy-nilly changes to master
It would be much better to have only tested, vetted code end up in master
So, you ask your development team to implement fixes and features on branches
What comes next?
The Mighty Pull Request
The next step is for your developers to make Pull Requests when they have completed their work
A pull request lets the manager of the project know that work is ready to be reviewed
The UI in GitHub provides ways to comment on code
Developers can make changes in response to comments and get them reviewed as well
All this is done, again, in the web browser
Go back to GitHub, to your new uge-workshop repository
Creating a PR
On the homepage of your repository, find the Pull Requests button in the menu on the right
Click it
It will open a page listing open pull requests
There should be none
click the big, green button that says New pull request

PR Setup
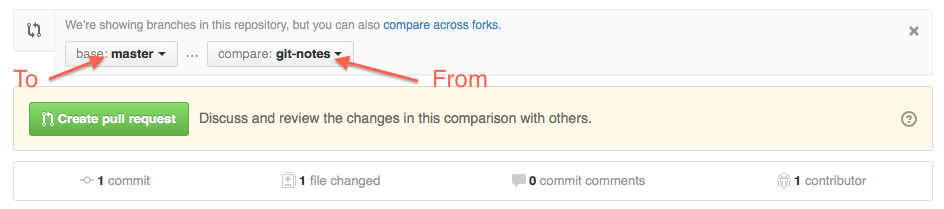
When you first arrive, you'll be offered a chance to set the to and from points for your new PR
Set them as shown in the image here
The base should be your master branch and the compare will be the git-notes branch
Finishing Up
When you're set, click Create pull request
On the next screen, enter a note about why the PR should be merged
Then click Create pull request again
And now, your developer is done
It's time for the manager to review
Reviewing a PR

In reviewing a pull request, the owner of a project is given quite a few tools
This tab bar shows that you can view individual files, all changed files, or only the review commments made so far
If you click on the code tabs, you can see the differences between the files in the from side and those in the to side
And if you hover over a line, an icon offers a chance to add comments directly alongside the code
So long as the request is open, changes made to the branch will be included
Merging the PR

When work is completed to everyone's satisfaction, the PR can be merged
The manager can click on the Conversation tab and look for this green button
It indicates that the pull request can be merged without conflict
If not present, work will be required to resolve conflicts before a merge can be completed.
Merge Your PR
Assuming you've been following along, you should be ready to merge your own pull request
Go ahead and do so when you're ready
When it's done, you've learned the basics of professional git workflow
Pulling Changes
Now that you've merged git-notes to master on GitHub, your local master branch is out-of-date
To catch up, we have to pull the changes back
Return to your terminal, and checkout the master branch of your repository
Make sure to use git branch to verify that you have master checked out
When ready, type the following:
$ git pull origin master
What happened
When you executed that command a few things took place:
- Git fetched all of the changes on master to a local branch called origin/master
- Git merged the changes from origin/master to your local master branch
You can accomplish the same thing on your own as two commands
But doing just one is so much easier
GIT COMMAND: pull
The pull command rolls two commands into one step.
- It fetches changes to a named branch from the named remote.
- Then it merges those changes into the current local branch.
You can perform these steps individually in order to gain more control or better predictability for integrating changes from remotes.
Learn more about this command and the related fetch and merge commands in Working with Remotes from the Pro Git book.
Review
Take a moment to reflect
COMMANDS
We've added the following unix commands to our repertoire:
| command | purpose |
|---|---|
| history | Interact with your command line history |
| less | Read large text inputs in a controlled fashion |
| mv | Move files from one place to another, or rename them, or both |
| touch | Create a new file, or update the modified date for an existing |
More Commands
There are a few others you might want to know:
| command | purpose |
|---|---|
| cp | Copy the contents of a file or directory to a new location |
| rm | Remove a file from the filesystem entirely |
| rmdir | Remove a directory from the filesystem if it is empty |
Git Commands
We've also learned quite a few git commands
- git init
- Creates a new repository in the present working directory
- git status
- Shows the state of the repository and all files in the same directory, including ones not yet added
- git add <file>
- Adds a new file to the repository, or adds a modified file to the stage so they can be committed
- git commit
- Commits all staged changes to files in the repository for safe keeping
- git push
- Pushes all changes from your local repository to the named remote
More Git Commands
- git branch
- Create and manage new and existing branches in your repository
- git checkout
- Change the active branch and/or the location of HEAD``
- git pull
- Fetch and merge all changes from a remote repository branch to a local branch
- git log
- Shows a list of the commits in the repository along with information about the time, owner and message associated with the change
- git config
- Set configuration for how git operates, either globally or per repository
Wrapping Up
There's much much more that could be said
But that's all I've written up here
If there's some spare time, we'd be happy to continue going over more advanced Unix commands or git operations
However, what you've learned today is plenty and enough to serve you well for quite some time
Master these fundamentals and you'll be well on your way to guru-hood
<Thank You!>