TCP/IP and Sockets
In this lesson we will establish an understanding of how computers communicate with each-other across a network.
The lesson has some longer code samples which you might want to have on hand.
They are reproduced in socket_exercises.py
Network Basics
The jobs that a computer done are referred to as processes. Processes are able to communicate with each-other. This communication can take place within a single machine, between two machines or among many machines in a network.
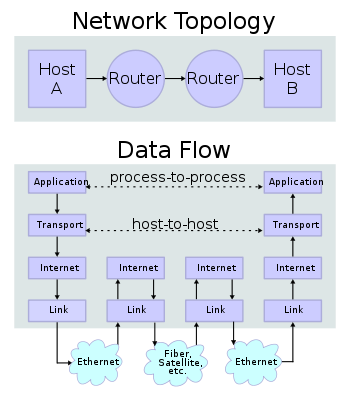
When we speak of the process of machines communicating with each-other, we talk about layers of activity. These layers are mostly arbitrary. There are a number of valid schemes for the layering. Each of these has differing names and even number of layers. But at the heart, all describe the same process. The most common of these schemes is called the TCP/IP Stack.
The TCP/IP Stack - Link
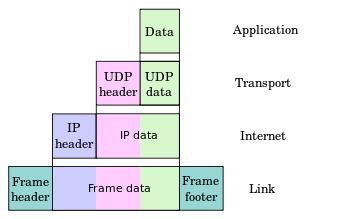
The bottom layer is the ‘Link Layer’. The link layer deals with the physical connections between machines, ‘the wire’ (if there is one). Here, we package data for physical transport from one machine to another. This layer is also responsible for executing the transmission of the packaged data over a physical medium. The nature of that medium is arbitrary, it might be wire, phone cables, radio waves, infrared light, or any number of other media.
In your computer, the Network Interface Card(s) (NIC) is responsible for operations at the link layer.
The TCP/IP Stack - Internet
Moving up, we have the ‘Internet Layer’. This layer deals with addressing messages and routing them from one machine to another. Here, we answer the questions where are we going and how do we get there?
The operations at this layer are agnostic as to physical medium. In fact, there’s a famous experiment in creating IP over Avian Carrier (IPoAC), which involved sending packets of data by carrier pigeon from one station to another.
The Internet layer makes no promises of reliability. You can send data, but using the protocols at this layer you cannot know whether it arrived or not.
There are two main addressing systems currently active in the internet layer.
The IPv4 system is the historical system, and remains the most widely used.
In IPv4 addresses look like this: 192.168.1.100.
They consist of strings that contain four decimal numbers between 0 and 255, separated by dots.
The drawback of this system is that the total number of addresses is limited.
There are a total of just over 4.25 million addresses, and given that entire blocks are reserved, it’s actually a lot less.
Even with network aliasing, we are running out of space rapidly.
The IPv6 system is the way of the future.
It’s already in use in a number of servers around the world.
In IPv6, the addresses consist of up to eight hexidecimal quartets, separated by colons: 2001:0db8:85a3:0042:0000:8a2e:0370:7334
In IPv6 there are 3.4 x 10^38 addresses, which works out to something like 10^32 addresses for every human alive on the planet today.
The TCP/IP Stack - Transport
Next up is the ‘Transport Layer’. This layer deals with transmission and reception of data by individual processes. At the transport layer, we find error correction, flow control, and congestion management.
Common protocols at the transport layer include TCP (Transmission Control Protocol) and UDP (User Datagram Protocol).
Not all Transport Protocols are ‘reliable’. For example, TCP ensures that dropped packets are resent. If you send a message, you are assured that it will arrive (or that you will know if it doesn’t). UDP makes no such assurance. In order to implement reliability, a certain amount of chatter between the sender and the receiver is required. Reliable protocols are slow and expensive in resources and time.
The ‘Transport Layer’ also establishes the concept of a port.
IP Addresses designate a specific machine on the network.
A port provides addressing for individual applications in a single host.
In an IPv4 address, we append a port using a colon: 192.168.1.100:80 (the :80 part is the port)
In IPv6, the colon is already the separator, so we wrap the address in square brackets and then add the port: [2001:db8:85a3:8d3:1319:8a2e:370:7348]:443 (:443 is the port)
Having a way to designate which process should receive a message is important. It means that you don’t have to worry about information intended for your web browser being accidentally read by your email client.
Ports
There are certain ports which are commonly understood to belong to given applications or communication methods:
- 80/443 - HTTP/HTTPS
- 20 - FTP
- 22 - SSH
- 23 - Telnet
- 25 - SMTP
- ...
These ports are often referred to as well-known ports. For a cannonical list, you can check this wikipedia page.
On all computers, there are a finite number of ports. The total is number is 65535. This total number is grouped into a few different classes.
Ports numbered 0 - 1023 are reserved. In order to assign such a port, a process must have administrator privileges.
Ports numbered 1024 - 65535 are open. This means that any process may claim one of these ports when running.
Ports numbered 1024 - 49151 may be registered. A registered port is associated with a particular application or process. For example, the PostgreSQL database system generally operates on port 5432. But these associations are not written in stone. You can feel free to open and use any port in this range.
Ports numbered 49152 - 65535 are called ephemeral. This means that in general these ports are managed by your OS. You should not ususally use them for your own processes.
The TCP/IP Stack - Application
The topmost layer is the ‘Application Layer’. This is the layer in which we live and work. Here, we deal directly with data produced or consumed by an application. This data is written using a set of understood, well-defined protocols. Some examples with which you might be familiar are HTTP, SMTP, or FTP.
The Application layer does not know (or need to know) about the functionality of lower layers. But we do have to communicate data out of the application layer. Sockets provide us with this ability.
Sockets
Think back for a second to what we just finished discussing, the TCP/IP stack. The Internet layer gives us an IP Address. The Transport layer establishes the idea of a port. The Application layer doesn’t care about what happens below... But we need to communicate out of our applications to other applications. We can do that by knowing an endpoint (IP:Port)
A Socket is the software representation of that endpoint. Opening a socket creates a kind of transceiver that can send and/or receive bytes at a given IP address and Port.
Sockets in Python
Python provides a standard library module which provides socket functionality.
It is called socket (py3).
The library is really just a very thin wrapper around the system implementation of BSD Sockets.
Let’s spend a few minutes getting to know this module.
We’re going to do this next part together, so open up a terminal and start an iPython interpreter.
To create a socket, you use the socket function (py3) from the socket library.
This function takes up to three optional arguments (here we use none to get the default behavior):
In [11]: foo = socket.socket()

In [12]: foo
Out[12]: <socket.socket fd=10, family=AddressFamily.AF_INET,
          type=SocketKind.SOCK_STREAM, proto=0, laddr=('0.0.0.0', 0)>
A socket has some properties that are immediately important to us. These include the family, type and protocol of the socket:
In [13]: foo.family
Out[13]: <AddressFamily.AF_INET: 2>

In [14]: foo.type
Out[14]: <SocketKind.SOCK_STREAM: 1>

In [15]: foo.proto
Out[15]: 0
You might notice that the values for these properties are integers (or integer-like). In fact, these integers are constants defined in the socket library.
Let’s define a method in iPython to help us see these constants.
It will take a single argument, the shared prefix for a defined set of constants.
(you can also find this in socket_exercises.py):
In [37]: def get_constants(prefix):
   ....:     """mapping of socket module constants to their names"""
   ....:     return {getattr(socket, n): n
   ....:             for n in dir(socket)
   ....:             if n.startswith(prefix)
   ....:     }
   ....:
Socket Families
Think back a moment to our discussion of the Internet layer of the TCP/IP stack. There were a couple of different types of IP addresses:
- IPv4 (‘192.168.1.100’)
- IPv6 (‘2001:0db8:85a3:0042:0000:8a2e:0370:7334’)
The family of a socket corresponds to the addressing system it uses for connecting.
Families defined in the socket library are prefixed by AF_:
In [39]: families = get_constants('AF_')

In [40]: families
Out[40]:
{<AddressFamily.AF_UNSPEC: 0>: 'AF_UNSPEC',
 <AddressFamily.AF_UNIX: 1>: 'AF_UNIX',
 <AddressFamily.AF_INET: 2>: 'AF_INET',
 ...
 <AddressFamily.AF_INET6: 30>: 'AF_INET6',
 <AddressFamily.AF_SYSTEM: 32>: 'AF_SYSTEM'}
Your results may vary.
Of all of these, the ones we care most about are 2 (IPv4) and 30 (IPv6).
However, when you are on a machine with an operating system that is Unix-like, you will find another generally useful socket family: AF_UNIX, or Unix Domain Sockets.
Sockets in this family are used to connect processes on the same machine.
This kind of connection is generally a bit slower than IPC connnections.
But they have the benefit of allowing the same API for programs that might run on one machine or across the network.
Unix socket addresses look like a pathname (‘/tmp/foo.sock’).
What is the default family for the socket we created just a moment ago?
(remember we bound the socket to the symbol foo)
Can we use the families dict above to figure this out?
Socket Types
The socket type determines the semantics of socket communications.
This means whether the socket will remain open and allow for two-way communications or will close immediately after transmitting a message.
We can look up socket type constants with the SOCK_ prefix:
In [42]: types = get_constants('SOCK_')

In [43]: types
Out[43]:
{<SocketKind.SOCK_STREAM: 1>: 'SOCK_STREAM',
 <SocketKind.SOCK_DGRAM: 2>: 'SOCK_DGRAM',
 <SocketKind.SOCK_RAW: 3>: 'SOCK_RAW',
 <SocketKind.SOCK_RDM: 4>: 'SOCK_RDM',
 <SocketKind.SOCK_SEQPACKET: 5>: 'SOCK_SEQPACKET'}
The most common are 1 (Stream communication (TCP)) and 2 (Datagram communication (UDP)).
If you are on a Linux machine, though, you can also use the 3 type (Raw sockets) to read all network traffic to an IP address and endpoint.
This is the foundation of a packet sniffer.
Using the same approach as for the family, find out the default type for our generic socket, foo?
Socket Protocols
A socket also has a designated protocol.
The constants for these are prefixed by IPPROTO_:
This controls the which internet layer protocol will be used to wrap or unwrap data sent through the socket.
In [45]: protocols = get_constants('IPPROTO_')

In [46]: protocols
Out[46]:
{0: 'IPPROTO_IP',
 ...
 6: 'IPPROTO_TCP',
 ...
 17: 'IPPROTO_UDP',
 ...}
What is the default protocol used by our generic socket, foo?
Customizing Sockets
We’ve now learned about the family, type, and proto properties of a socket.
These three properties correspond to the three positional arguments you may pass to the socket constructor.
Using them allows you to create sockets with specific communications profiles:
In [3]: socket.socket(socket.AF_INET,
   ...:               socket.SOCK_DGRAM,
   ...:               socket.IPPROTO_UDP)
Out[3]: <socket.socket fd=7,
            family=AddressFamily.AF_INET,
            type=SocketKind.SOCK_DGRAM,
            proto=17,
            laddr=('0.0.0.0', 0)>
Communicating With Sockets
Sockets by themselves are not particularly useful. The purpose of a socket of course is to communicate with other sockets. In order to create a socket that is able to communicate with another socket, you must match the communications profile of the other socket.
The socket library provides a function useful for this purpose: getaddrinfo (py3).
This function takes two arguments.
The first is either an IP address or a hostname.
If you use a hostname, DNS (Domain Name Services) will be used to resolve the name to an IP address.
If DNS is unavailable or misconfigured, this will cause an error.
The second is either a port number, or a protocol name (like "http", "https", "smtp", ...)
If you use the name of a protocol, it will be converted into the well-known port reserved for that protocol.
This will not work for protocols which work outside the range of well-known ports.
In [11]: socket.getaddrinfo('127.0.0.1', 'http')
Out[11]:
[(<AddressFamily.AF_INET: 2>,
  <SocketKind.SOCK_DGRAM: 2>,
  17,
  '',
  ('127.0.0.1', 80)),
 (<AddressFamily.AF_INET: 2>,
  <SocketKind.SOCK_STREAM: 1>,
  6,
  '',
  ('127.0.0.1', 80))]
The return value from this function is always a list. The list will contain zero or more 5-tuples. The elements in the 5-tuple are, in order:
- socket family
- socket type
- socket protocol
- canonical name (this is generally empty, you must request it via a flag in the socket library)
- socket address (this will always be a tuple of IP and Port)
Note
If the family of the socket is IPv4 (AF_INET), the address will contain 2 elements: address and port.
IPv6 (AF_INET6), the address will contain 4 elements: address, port, flow info, and scope id.
These tuples can be used to create appropriate sockets to connect to the remote address. To illustrate this point, let’s create a server socket and client socket and send a message back and forth.
Server Sockets
The most common relationship between two sockets on remote machines is that of a server and a client. The server socket waits in an open state for a client to communicate with it. Or perhaps it broadcasts messages so any client that is listening.
We’ll experiment with this relationship now to get an idea of how socket communications work in the real world.
We start by creating a server socket with a specific communications profile.
We’ll use the IPv4 addressing system, streaming semantics and the TCP internet layer protocol:
In [23]: server = socket.socket(socket.AF_INET,
   ....:                        socket.SOCK_STREAM,
   ....:                        socket.IPPROTO_TCP)
In [24]: server
Out[24]: <socket.socket fd=10, family=AddressFamily.AF_INET,
            type=SocketKind.SOCK_STREAM, proto=6, laddr=('0.0.0.0', 0)>
Once we’ve created a socket, the next step for a server is to bind (py3) to an address.
The address must be provided in the appropriate form for the addressing system (a two-tuple for IPv4 or a four-tuple for IPv6).
In [25]: address = ('127.0.0.1', 5000)
In [26]: server.bind(address)
In [27]: server
Out[27]: <socket.socket fd=10, family=AddressFamily.AF_INET,
            type=SocketKind.SOCK_STREAM, proto=6, laddr=('127.0.0.1', 5000)>
In [28]:
Notice that the laddr property of our socket has now updated to show the address to which we have bound.
Next, we use the listen method (py3) to prepare the socket to hear incoming connection requests.
The sole argument to this method is an integer representing the backlog.
This number controls how many incoming requests can be queued by the server socket while the connection between it and the client is established.
An incoming request is placed in this queue, and is removed once an open connection is established (more on this below).
In [29]: server.listen(1)
In [30]:
The last step for our server preparation is to call the accept method (py3) to accept an incoming connection from a client.
This method is blocking, which means that it will not return a value until a connection is actually made with a client socket.
The return value is a two-tuple which will contain a new socket which is connected to the client, and a tuple containing the address of the client.
Let’s go ahead and call this method for our server to see it block:
In [30]: conn, addr = server.accept()
Notice now that our iPython prompt has not returned. Python is waiting for a client to connect to our server. Let’s provide one now.
Client Sockets
Our server socket is waiting in an iPython interpreter for a new connection. In order to create a client, we’ll need to run a new interpreter. Open a second terminal and run a new iPython process.
To set up the client socket, we must ensure that it has the same communications profile as the server socket we have created.
We can manually do this, but it’s probably better to use the getaddrinfo method described above to get the right information.
We can ask for any socket that might be available on our local machine using port 5000.
Then we can filter that list and grab the first value that provides the type of semantics we want (streaming):
In [1]: import socket
In [2]: infos = socket.getaddrinfo('127.0.0.1', 5000)
In [3]: len(infos)
Out[3]: 2
In [4]: stream_info = [i for i in infos if i[1] == socket.SOCK_STREAM][0]
In [5]: stream_info
Out[5]:
(<AddressFamily.AF_INET: 2>,
 <SocketKind.SOCK_STREAM: 1>,
 6,
 '',
 ('127.0.0.1', 5000))
Remember that the three arguments required to set up a customized socket are the family, type, and protocol.
These are also the first three elements in the five-tuples returned by getaddrinfo.
We can use slicing and argument unpacking to generate a new socket directly from this info:
In [6]: client = socket.socket(*stream_info[:3])
In [7]: client
Out[7]: <socket.socket fd=9, family=AddressFamily.AF_INET,
        type=SocketKind.SOCK_STREAM, proto=6, laddr=('0.0.0.0', 0)>
Once our client socket is set up, we need to connect (py3) to our server socket.
We can use the last item in the five-tuple from our stream_info as the argument to the connect method.
Before we do so, though, make sure you can also see the window where your server socket is waiting.
In [8]: client.connect(stream_info[-1])
In [9]:
You should see that the call to accept in your server interpreter has now returned.
Let’s see the values that have been bound to conn and addr:
In [32]: conn
Out[32]: <socket.socket fd=11, family=AddressFamily.AF_INET,
            type=SocketKind.SOCK_STREAM, proto=6, laddr=('127.0.0.1', 5000),
            raddr=('127.0.0.1', 55971)>
In [33]: addr
Out[33]: ('127.0.0.1', 55971)
And let’s check the address claimed by our client socket:
In [10]: client
Out[10]: <socket.socket fd=9, family=AddressFamily.AF_INET,
            type=SocketKind.SOCK_STREAM, proto=6, laddr=('127.0.0.1', 55971),
            raddr=('127.0.0.1', 5000)>
The laddr``and ``raddr properties of our two sockets show that they are connected to each-other.
And now we can use them to send messages back and forth.
Sending and Receiving
Let’s start by sending a message from our client to our server. There are two methods we could use to do this.
The first, send (py3), takes a byte string to be sent, and returns the number of bytes that were actually sent.
If the any of the data remains unsent, our application is responsible for re-trying to send the remainder.
The second, sendall (py3), takes a byte string to be sent as well.
However, with this method the entire string is sent, or the method will return an error.
The return value if the message is sent is None.
If an error occurs, there is no way to know exactly how much of the data was successfully sent, if any.
The type of the error raised is useful in determining what exactly went wrong.
Let’s use the second method to send a message from our client to the server:
In [11]: message = u'This is a fancy message, containing über-important information'
In [12]: client.sendall(message.encode('utf8'))
In [13]:
Notice that we must encode the message we want to send into a byte string before it is passed to the socket. Sockets cannot accept unicode strings.
Now that we have sent a message from the client, we can turn to the server to receive it.
Remember that the server socket returned a new socket we called conn which is the actuall connection to the client.
We will use the recv method (py3) on this socket.
The method takes a single, required argument, an integer which represents the number of bytes to read from the socket.
If the length of the return value of this call is less than the number of bytes we requested, then we can know that the message has been completely received.
In [34]: buffer_length = 8
In [35]: message_complete = False
In [36]: while not message_complete:
   ....:     part = conn.recv(buffer_length)
   ....:     print(part.decode('utf8'))
   ....:     if len(part) < buffer_length:
   ....:         break
   ....:
This is
a fancy
message,
 contain
ing übe
r-import
ant info
rmation
In [37]:
Notice that there are only seven bytes in that last line. That signals to us that we have received everything the client has sent.
At this point, we can send a message back to the client.
Again, we want to use the conn socket that the server passed us when the client connected.
And we must not forget to encode the message we send to bytes.
In [37]: message = "I hear you, loud and clear!"
In [38]: conn.sendall(message.encode('utf8'))
In [39]:
Back on the client side, we can use the same recv method to receive the message the server has sent back to us.
In [13]: buffer_length = 8
In [14]: reply_complete = False
In [15]: while not reply_complete:
   ....:     part = client.recv(buffer_length)
   ....:     print(part.decode('utf8'))
   ....:     if len(part) < buffer_length:
   ....:         break
   ....:
I hear y
ou, loud
 and cle
ar!
In [16]:
Now that the exchange is complete, we can close both the client socket, and the connection socket set up by the server:
In [39]: conn.close()
In [40]:
In [16]: client.close()
In [17]:
Remember, our server socket is still open.
Now that we are done processing a single client connection, we can make a new call to accept to prepare for another.
But enough for now.
Let’s close the server socket too.
In [40]: server.close()
In [41]:
Wrap Up
In this lesson we’ve learned a bit about the TCP/IP stack. We also learned how Python allows us to communicate with another machine from the application layer using sockets. We learned about the ways in which we can customize sockets to use different communications profiles. And we learned how to get information about the profiles used by the sockets we want to connect to. Finally, we learned how to pass messages through sockets and read them from the socket where they are received.
You’ll use this skill to create a simple Socket Echo Server.