Session 01

Networking and Sockets
Computer Communications
Wherein we learn about how computers speak to each-other over a network.
But First
Class presentations are available online for your use
https://github.com/UWPCE-PythonCert/training.python_web
Licensed with Creative Commons BY-NC-SA
- You must attribute the work
- You may not use the work for commercial purposes
- You have to share your versions just like this one
Find mistakes? See improvements? Make a pull request.
The rendered documentation is available as well:
http://uwpce-pythoncert.github.io
Please check frequently. I will update with great regularity
Classroom Protocol
Questions to ask:
- What did you just say?
- Please explain what we just did again?
- How did that work?
- Why didn’t that work for me?
- Is that a typo?
Classroom Protocol
Questions not to ask:
- Hypotheticals: What happens if I do X?
- Research: Can Python do Y?
- Syllabus: Are we going to cover Z in class?
- Marketing questions: please just don’t.
- Performance questions: Is Python fast enough?
- Unpythonic: Why doesn’t Python do it some other way?
- Show off: Look what I just did!
Introductions
TCP/IP
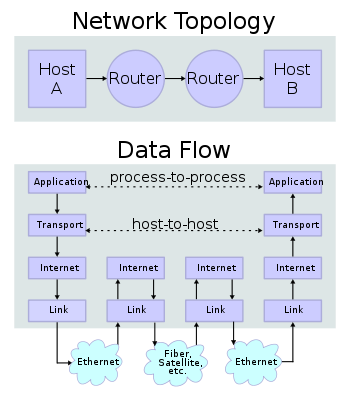
- processes can communicate
- inside one machine
- between two machines
- among many machines
- Process divided into ‘layers’
- ‘Layers’ are mostly arbitrary
- Different descriptions have different layers
- Most common is the ‘TCP/IP Stack’
The TCP/IP Stack - Link
The bottom layer is the ‘Link Layer’
- Deals with the physical connections between machines, ‘the wire’
- Packages data for physical transport
- Executes transmission over a physical medium
- what that medium is is arbitrary
- Implemented in the Network Interface Card(s) (NIC) in your computer
The TCP/IP Stack - Internet
Moving up, we have the ‘Internet Layer’
- Deals with addressing and routing
- Where are we going and how do we get there?
- Agnostic as to physical medium (IP over Avian Carrier - IPoAC)
- Makes no promises of reliability
- Two addressing systems
- IPv4 (current, limited ‘192.168.1.100’)
- IPv6 (future, 3.4 x 10^38 addresses, ‘2001:0db8:85a3:0042:0000:8a2e:0370:7334’)
That’s 4.3 x 10^28 addresses per person alive today
The TCP/IP Stack - Transport
Next up is the ‘Transport Layer’
- Deals with transmission and reception of data
- error correction, flow control, congestion management
- Common protocols include TCP & UDP
- TCP: Tranmission Control Protocol
- UDP: User Datagram Protocol
- Not all Transport Protocols are ‘reliable’
- TCP ensures that dropped packets are resent
- UDP makes no such assurance
- Reliability is slow and expensive
The ‘Transport Layer’ also establishes the concept of a port
- IP Addresses designate a specific machine on the network
- A port provides addressing for individual applications in a single host
- 192.168.1.100:80 (the :80 part is the port)
- [2001:db8:85a3:8d3:1319:8a2e:370:7348]:443 (:443 is the port)
This means that you don’t have to worry about information intended for your web browser being accidentally read by your email client.
There are certain ports which are commonly understood to belong to given applications or protocols:
- 80/443 - HTTP/HTTPS
- 20 - FTP
- 22 - SSH
- 23 - Telnet
- 25 - SMTP
- ...
These ports are often referred to as well-known ports
(see http://en.wikipedia.org/wiki/List_of_TCP_and_UDP_port_numbers)
Ports are grouped into a few different classes
- Ports numbered 0 - 1023 are reserved
- Ports numbered 1024 - 65535 are open
- Ports numbered 1024 - 49151 may be registered
- Ports numbered 49152 - 65535 are called ephemeral
The TCP/IP Stack - Application
The topmost layer is the ‘Application Layer’
- Deals directly with data produced or consumed by an application
- Reads or writes data using a set of understood, well-defined protocols
- HTTP, SMTP, FTP etc.
- Does not know (or need to know) about lower layer functionality
- The exception to this rule is endpoint data (or IP:Port)
this is where we live and work
Sockets
Think back for a second to what we just finished discussing, the TCP/IP stack.
- The Internet layer gives us an IP Address
- The Transport layer establishes the idea of a port.
- The Application layer doesn’t care about what happens below...
- Except for endpoint data (IP:Port)
A Socket is the software representation of that endpoint.
Opening a socket creates a kind of transceiver that can send and/or receive bytes at a given IP address and Port.
Sockets in Python
Python provides a standard library module which provides socket functionality. It is called socket.
The library is really just a very thin wrapper around the system implementation of BSD Sockets
Let’s spend a few minutes getting to know this module.
We’re going to do this next part together, so open up a terminal and start an iPython interpreter
The Python sockets library allows us to find out what port a service uses:
In [1]: import socket

In [2]: socket.getservbyname('ssh')
Out[2]: 22
You can also do a reverse lookup, finding what service uses a given port:
In [3]: socket.getservbyport(80)
Out[3]: 'http'
The sockets library also provides tools for finding out information about hosts. For example, you can find out about the hostname and IP address of the machine you are currently using:
In [4]: socket.gethostname()
Out[4]: 'Banks'

In [5]: socket.gethostbyname(socket.gethostname())
Out[5]: '127.0.0.1'
You can also find out about machines that are located elsewhere, assuming you know their hostname. For example:
In [6]: socket.gethostbyname('google.com')
Out[6]: '173.194.33.100'

In [7]: socket.gethostbyname('uw.edu')
Out[7]: '128.95.155.134'

In [8]: socket.gethostbyname('crisewing.com')
Out[8]: '108.168.213.86'
The gethostbyname_ex method of the socket library provides more
information about the machines we are exploring:
In [9]: socket.gethostbyname_ex('crisewing.com')
Out[9]: ('crisewing.com', [], ['108.168.213.86'])

In [10]: socket.gethostbyname_ex('google.com')
Out[10]:
('google.com',
 [],
 ['173.194.33.100', '173.194.33.103',
  ...
  '173.194.33.97', '173.194.33.104'])
To create a socket, you use the socket method of the socket library.
It takes up to three optional positional arguments (here we use none to get
the default behavior):
In [11]: foo = socket.socket()

In [12]: foo
Out[12]: <socket.socket fd=10, family=AddressFamily.AF_INET,
          type=SocketKind.SOCK_STREAM, proto=0, laddr=('0.0.0.0', 0)>
A socket has some properties that are immediately important to us. These include the family, type and protocol of the socket:
In [13]: foo.family
Out[13]: <AddressFamily.AF_INET: 2>

In [14]: foo.type
Out[14]: <SocketKind.SOCK_STREAM: 1>

In [15]: foo.proto
Out[15]: 0
You might notice that the values for these properties are integers. In fact, these integers are constants defined in the socket library.
Let’s define a method in place to help us see these constants. It will take a single argument, the shared prefix for a defined set of constants:
(you can also find this in resources/session01/socket_tools.py)
In [37]: def get_constants(prefix):
   ....:     """mapping of socket module constants to their names"""
   ....:     return {getattr(socket, n): n
   ....:             for n in dir(socket)
   ....:             if n.startswith(prefix)
   ....:     }
   ....:
Socket Families
Think back a moment to our discussion of the Internet layer of the TCP/IP stack. There were a couple of different types of IP addresses:
- IPv4 (‘192.168.1.100’)
- IPv6 (‘2001:0db8:85a3:0042:0000:8a2e:0370:7334’)
The family of a socket corresponds to the addressing system it uses for connecting.
Families defined in the socket library are prefixed by AF_:
In [39]: families = get_constants('AF_')

In [40]: families
Out[40]:
{<AddressFamily.AF_UNSPEC: 0>: 'AF_UNSPEC',
 <AddressFamily.AF_UNIX: 1>: 'AF_UNIX',
 <AddressFamily.AF_INET: 2>: 'AF_INET',
 ...
 <AddressFamily.AF_INET6: 30>: 'AF_INET6',
 <AddressFamily.AF_SYSTEM: 32>: 'AF_SYSTEM'}
Your results may vary
Of all of these, the ones we care most about are 2 (IPv4) and 30
(IPv6).
When you are on a machine with an operating system that is Unix-like, you will
find another generally useful socket family: AF_UNIX, or Unix Domain
Sockets. Sockets in this family:
- connect processes on the same machine
- are generally a bit slower than IPC connnections
- have the benefit of allowing the same API for programs that might run on one machine __or__ across the network
- use an ‘address’ that looks like a pathname (‘/tmp/foo.sock’)
What is the default family for the socket we created just a moment ago?
(remember we bound the socket to the symbol foo)
How did you figure this out?
Socket Types
The socket type determines the semantics of socket communications.
Look up socket type constants with the SOCK_ prefix:
In [42]: types = get_constants('SOCK_')

In [43]: types
Out[43]:
{<SocketKind.SOCK_STREAM: 1>: 'SOCK_STREAM',
 <SocketKind.SOCK_DGRAM: 2>: 'SOCK_DGRAM',
 <SocketKind.SOCK_RAW: 3>: 'SOCK_RAW',
 <SocketKind.SOCK_RDM: 4>: 'SOCK_RDM',
 <SocketKind.SOCK_SEQPACKET: 5>: 'SOCK_SEQPACKET'}
The most common are 1 (Stream communication (TCP)) and 2 (Datagram
communication (UDP)).
What is the default type for our generic socket, foo?
Socket Protocols
A socket also has a designated protocol. The constants for these are
prefixed by IPPROTO_:
In [45]: protocols = get_constants('IPPROTO_')

In [46]: protocols
Out[46]:
{0: 'IPPROTO_IP',
 ...
 6: 'IPPROTO_TCP',
 ...
 17: 'IPPROTO_UDP',
 ...}
The choice of which protocol to use for a socket is determined by the
internet layer protocol you intend to use. TCP? UDP? ICMP?
IGMP?
What is the default protocol used by our generic socket, foo?
Customizing Sockets
These three properties of a socket correspond to the three positional arguments you may pass to the socket constructor.
Using them allows you to create sockets with specific communications profiles:
In [3]: socket.socket(socket.AF_INET,
   ...:               socket.SOCK_DGRAM,
   ...:               socket.IPPROTO_UDP)
Out[3]: <socket.socket fd=7,
            family=AddressFamily.AF_INET,
            type=SocketKind.SOCK_DGRAM,
            proto=17,
            laddr=('0.0.0.0', 0)>
Break Time
So far we have:
- learned about the “layers” of the TCP/IP Stack
- discussed families, types and protocols in sockets
- learned how to create sockets with a specific communications profile.
When we return we’ll learn how to find the communcations profiles of remote sockets, how to connect to them, and how to send and receive messages.
Take a few minutes now to clear your head (do not quit your python interpreter).
Address Information
When you are creating a socket to communicate with a remote service, the remote socket will have a specific communications profile.
The local socket you create must match that communications profile.
How can you determine the correct values to use?
You ask.
The function socket.getaddrinfo provides information about available
connections on a given host.
socket.getaddrinfo('127.0.0.1', 80)
This provides all you need to make a proper connection to a socket on a remote host. The value returned is a tuple of:
- socket family
- socket type
- socket protocol
- canonical name (usually empty, unless requested by flag)
- socket address (tuple of IP and Port)
Again, let’s create a utility method in-place so we can see this in action:
In [10]: def get_address_info(host, port):
   ....:     for response in socket.getaddrinfo(host, port):
   ....:         fam, typ, pro, nam, add = response
   ....:         print('family: {}'.format(families[fam]))
   ....:         print('type: {}'.format(types[typ]))
   ....:         print('protocol: {}'.format(protocols[pro]))
   ....:         print('canonical name: {}'.format(nam))
   ....:         print('socket address: {}'.format(add))
   ....:         print('')
   ....:
(you can also find this in resources/session01/socket_tools.py)
Now, ask your own machine what possible connections are available for ‘http’:
In [11]: get_address_info(socket.gethostname(), 'http')
family: AF_INET
type: SOCK_DGRAM
protocol: IPPROTO_UDP
canonical name:
socket address: ('127.0.0.1', 80)

family: AF_INET
type: SOCK_STREAM
protocol: IPPROTO_TCP
canonical name:
socket address: ('127.0.0.1', 80)
What answers do you get?
In [12]: get_address_info('crisewing.com', 'http')
family: AF_INET
type: SOCK_DGRAM
protocol: IPPROTO_UDP
canonical name:
socket address: ('108.168.213.86', 80)

family: AF_INET
type: SOCK_STREAM
protocol: IPPROTO_TCP
canonical name:
socket address: ('108.168.213.86', 80)
Client Side
Let’s put this to use
We’ll communicate with a remote server as a client
Construct a Socket
We’ve already made a socket foo using the generic constructor without any
arguments. We can make a better one now by using real address information from
a real server online [do not type this yet]:
In [13]: streams = [info
   ....:     for info in socket.getaddrinfo('crisewing.com', 'http')
   ....:     if info[1] == socket.SOCK_STREAM]
   ....:
In [14]: streams
Out[14]:
[(<AddressFamily.AF_INET: 2>,
  <SocketKind.SOCK_STREAM: 1>,
  6,
  '',
  ('108.168.213.86', 80))]
In [15]: info = streams[0]
In [16]: cewing_socket = socket.socket(*info[:3])
Connecting a Socket
Once the socket is constructed with the appropriate family, type and protocol, we can connect it to the address of our remote server:
In [18]: cewing_socket.connect(info[-1])
- a successful connection returns
None - a failed connection raises an error
- you can use the type of error returned to tell why the connection failed.
Sending a Message
Send a message to the server on the other end of our connection (we’ll learn in session 2 about the message we are sending):
In [19]: msg = "GET / HTTP/1.1\r\n"
In [20]: msg += "Host: crisewing.com\r\n\r\n"
In [21]: msg = msg.encode('utf8')
In [22]: msg
Out[22]: b'GET / HTTP/1.1\r\nHost: crisewing.com\r\n\r\n'
In [23]: cewing_socket.sendall(msg)
- the transmission continues until all data is sent or an error occurs
- success returns
None - failure to send raises an error
- the type of error can tell you why the transmission failed
- but you cannot know how much, if any, of your data was sent
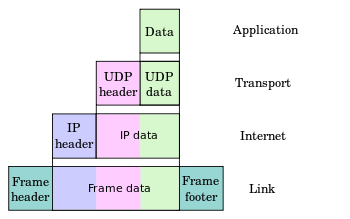
Messages Are Bytes
One detail from the previous code should stand out:
In [21]: msg = msg.encode('utf8')
In [22]: msg
Out[22]: b'GET / HTTP/1.1\r\nHost: crisewing.com\r\n\r\n'
You can only send bytes through a socket, never unicode
In [35]: cewing_socket.sendall(msg.decode('utf8'))
---------------------------------------------------------------------------
TypeError                                 Traceback (most recent call last)
<ipython-input-35-8178ec7f234d> in <module>()
----> 1 cewing_socket.sendall(msg.decode('utf8'))

TypeError: 'str' does not support the buffer interface
Receiving a Reply
Whatever reply we get is received by the socket we created. We can read it back out (again, do not type this yet):
In [24]: response = cewing_socket.recv(4096)
In [25]: response[:60]
Out[25]: b'HTTP/1.1 200 OK\r\nServer: nginx\r\nDate: Sun, 20 Sep 2015 03:38'
- The sole required argument is
buffer_size(an integer). It should be a power of 2 and smallish (~4096) - It returns a byte string of
buffer_size(or smaller if less data was received) - If the response is longer than
buffer size, you can call the method repeatedly. The last bunch will be less thanbuffer size.
Cleaning Up
When you are finished with a connection, you should always close it:
cewing_socket.close()
Putting it all together
First, connect and send a message:
In [55]: info = socket.getaddrinfo('crisewing.com', 'http')
In [56]: streams = [i for i in info if i[1] == socket.SOCK_STREAM]
In [57]: sock_info = streams[0]
In [58]: msg = "GET / HTTP/1.1\r\n"
In [59]: msg += "Host: crisewing.com\r\n\r\n"
In [60]: msg = msg.encode('utf8')
In [61]: cewing_socket = socket.socket(*sock_info[:3])
In [62]: cewing_socket.connect(sock_info[-1])
In [63]: cewing_socket.sendall(msg)
Then, receive a reply, iterating until it is complete:
In [65]: buffsize = 4096
In [66]: response = b''
In [67]: done = False
In [68]: while not done:
   ....:     msg_part = cewing_socket.recv(buffsize)
   ....:     if len(msg_part) < buffsize:
   ....:         done = True
   ....:         cewing_socket.close()
   ....:     response += msg_part
   ....:
In [69]: len(response)
Out[69]: 19464
Server Side
What about the other half of the equation?
Let’s build a server and see how that part works.
Construct a Socket
For the moment, stop typing this into your interpreter.
Again, we begin by constructing a socket. Since we are actually the server this time, we get to choose family, type and protocol:
In [70]: server_socket = socket.socket(
   ....:     socket.AF_INET,
   ....:     socket.SOCK_STREAM,
   ....:     socket.IPPROTO_TCP)

In [71]: server_socket
Out[71]: <socket.socket fd=12, family=AddressFamily.AF_INET,
            type=SocketKind.SOCK_STREAM, proto=6, laddr=('0.0.0.0', 0)>
Bind the Socket
Our server socket needs to be bound to an address. This is the IP Address and Port to which clients must connect:
In [72]: address = ('127.0.0.1', 50000)
In [73]: server_socket.bind(address)
Terminology Note: In a server/client relationship, the server binds to an address and port. The client connects
Listen for Connections
Once our socket is bound to an address, we can listen for attempted connections:
In [74]: server_socket.listen(1)
- The argument to
listenis the backlog - The backlog is the maximum number of connection requests that the socket will queue
- Once the limit is reached, the socket refuses new connections.
Accept A Connection
When a socket is listening, it can receive incoming connection requests:
In [75]: connection, client_address = server_socket.accept()
- The call to
socket.accept()is a blocking call. It will not return values until a client connects - The
connectionreturned by a call toacceptis a new socket. This new socket is used to communicate with the client - The
client_addressis a two-tuple of IP Address and Port for the client socket - When a connection request is ‘accepted’, it is removed from the backlog queue.
Communicate
The connection socket can now be used to receive messages from the client
which made the connection:
In [76]: connection.recv(buffsize)
It may also be used to return a reply:
In [77]: connection.sendall("message received")
Clean Up
Once a transaction between the client and server is complete, the
connection socket should be closed:
In [78]: connection.close()
At this point, the server_socket can again accept a new client
connection.
Note that the server_socket is never closed as long as the server
continues to run.
Getting the Flow
The flow of this interaction can be a bit confusing. Let’s see it in action step-by-step.
Create a Server
In your first python interpreter, create a server socket and prepare it for connections:
In [81]: server_socket = socket.socket(
   ....:     socket.AF_INET,
   ....:     socket.SOCK_STREAM,
   ....:     socket.IPPROTO_IP)
In [82]: server_socket.bind(('127.0.0.1', 50000))
In [83]: server_socket.listen(1)
In [84]: conn, addr = server_socket.accept()
At this point, you should not get back a prompt. The server socket is waiting for a connection to be made.
Create a Client
In your second interpreter, create a client socket and prepare to send a message:
In [1]: import socket
In [2]: client_socket = socket.socket(
   ...:     socket.AF_INET,
   ...:     socket.SOCK_STREAM,
   ...:     socket.IPPROTO_IP)
Before connecting, keep your eye on the server interpreter:
In [3]: client_socket.connect(('127.0.0.1', 50000))
Send a Message Client->Server
As soon as you made the connection above, you should have seen the prompt
return in your server interpreter. The accept method finally returned a
new connection socket.
When you’re ready, type the following in the client interpreter:
In [4]: client_socket.sendall('Hey, can you hear me?'.encode('utf8'))
Receive and Respond
Back in your server interpreter, go ahead and receive the message from your client:
In [87]: msg = conn.recv(4096)
In [88]: msg
Out[88]: b'Hey, can you hear me?'
Send a message back, and then close up your connection:
In [89]: conn.sendall('Yes, I can hear you.'.encode('utf8'))
In [90]: conn.close()
Finish Up
Back in your client interpreter, take a look at the response to your message, then be sure to close your client socket too:
In [5]: from_server = client_socket.recv(4096)
In [6]: from_server
Out[6]: b'Yes, I can hear you.'
In [7]: client_socket.close()
And now that we’re done, we can close up the server socket too (back in the server interpreter):
In [91]: server_socket.close()
You’ve run your first client-server interaction
Homework
Your homework assignment for this week is to take what you’ve learned here and build a simple “echo” server.
The server should automatically return to any client that connects exactly what it receives (it should echo all messages).
You will also write a python script that, when run, will send a message to the
server and receive the reply, printing it to stdout.
Finally, you’ll do all of this so that it can be tested.
Your Task
In our class repository, there is a folder resources/session01.
Inside that folder, you should find:
- A file
tasks.txtthat contains these instructions - A skeleton for your server in
echo_server.py - A skeleton for your client script in
echo_client.py - Some simple tests in
tests.py
Your task is to make the tests pass.
Running the Tests
To run the tests, you’ll have to set the server running in one terminal:
$ python echo_server.py
Then, in a second terminal, you will execute the tests:
$ python tests.py
You should see output like this:
[...]
FAILED (failures=2)
Submitting Your Homework
To submit your homework:
- Create a new repository in GitHub. Call it
echo_sockets. - Put the
echo_server.py,echo_client.pyandtests.pyfiles in this repository. - Send us an email with a link to your repository when you are done.
We will clone your repository and run the tests as described above.
And we’ll make comments inline on your repository.
Going Further
In resources/session01/tasks.txt you’ll find a few extra problems to try.
If you finish the first part of the homework in less than 3-4 hours give one or more of these a whirl.
They are not required, but if you include solutions in your repository, we’ll review your work.